> ## Documentation Index
> Fetch the complete documentation index at: https://portkey-docs-migration-03-llm-providers.mintlify.site/llms.txt
> Use this file to discover all available pages before exploring further.
# Azure Entra
> Setup Azure Entra for SCIM provisioning with Portkey.
#### Azure Active Directory (Azure AD)
[Reference](https://learn.microsoft.com/en-us/azure/active-directory/app-provisioning/use-scim-to-provision-users-and-groups)
Setting up Azure Entra for SCIM provisioning consists of the following steps:
* **New Entra Application & SCIM Provisioning**
* **Application Roles**
* **SCIM Attribute Mapping Update**
***
##### New Entra Application
First, create a new Azure Entra application to set up SCIM provisioning with Portkey.
1. Navigate to the [Entra Applications Page](https://entra.microsoft.com/?culture=en-in\&country=in#view/Microsoft_AAD_IAM/AppGalleryBladeV2) and click **`Create your own application`**.
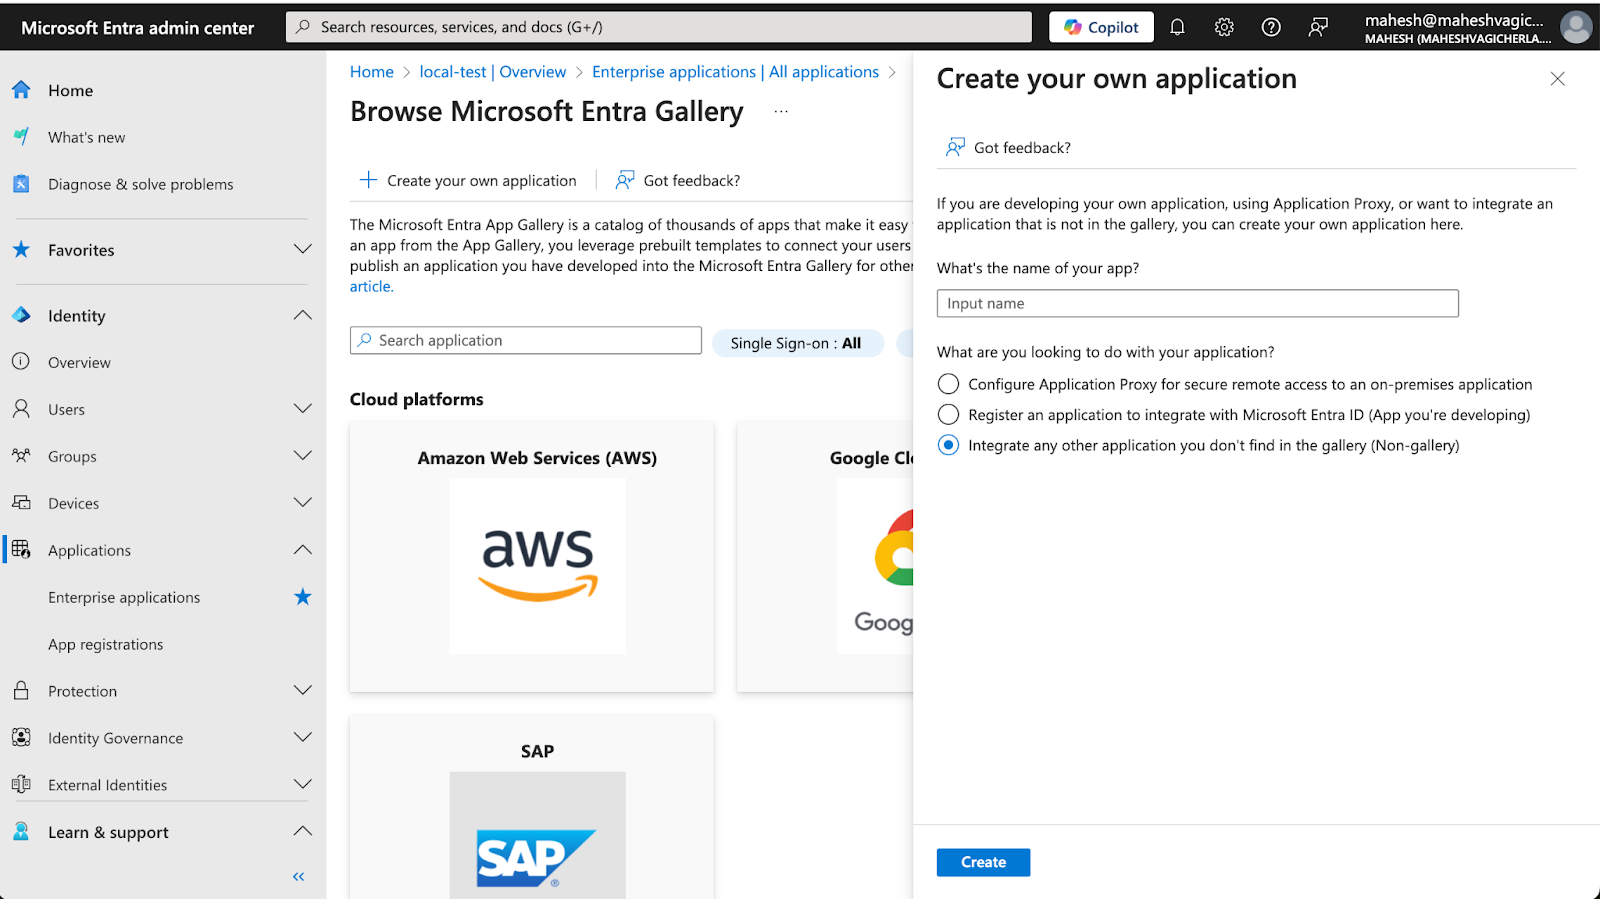 2. Complete the required fields to create a new application.
3. Once the application is created, navigate to the application's **Provisioning** page under the **Manage** section.
4. Click **`New Configuration`** to go to the provisioning settings page.
2. Complete the required fields to create a new application.
3. Once the application is created, navigate to the application's **Provisioning** page under the **Manage** section.
4. Click **`New Configuration`** to go to the provisioning settings page.
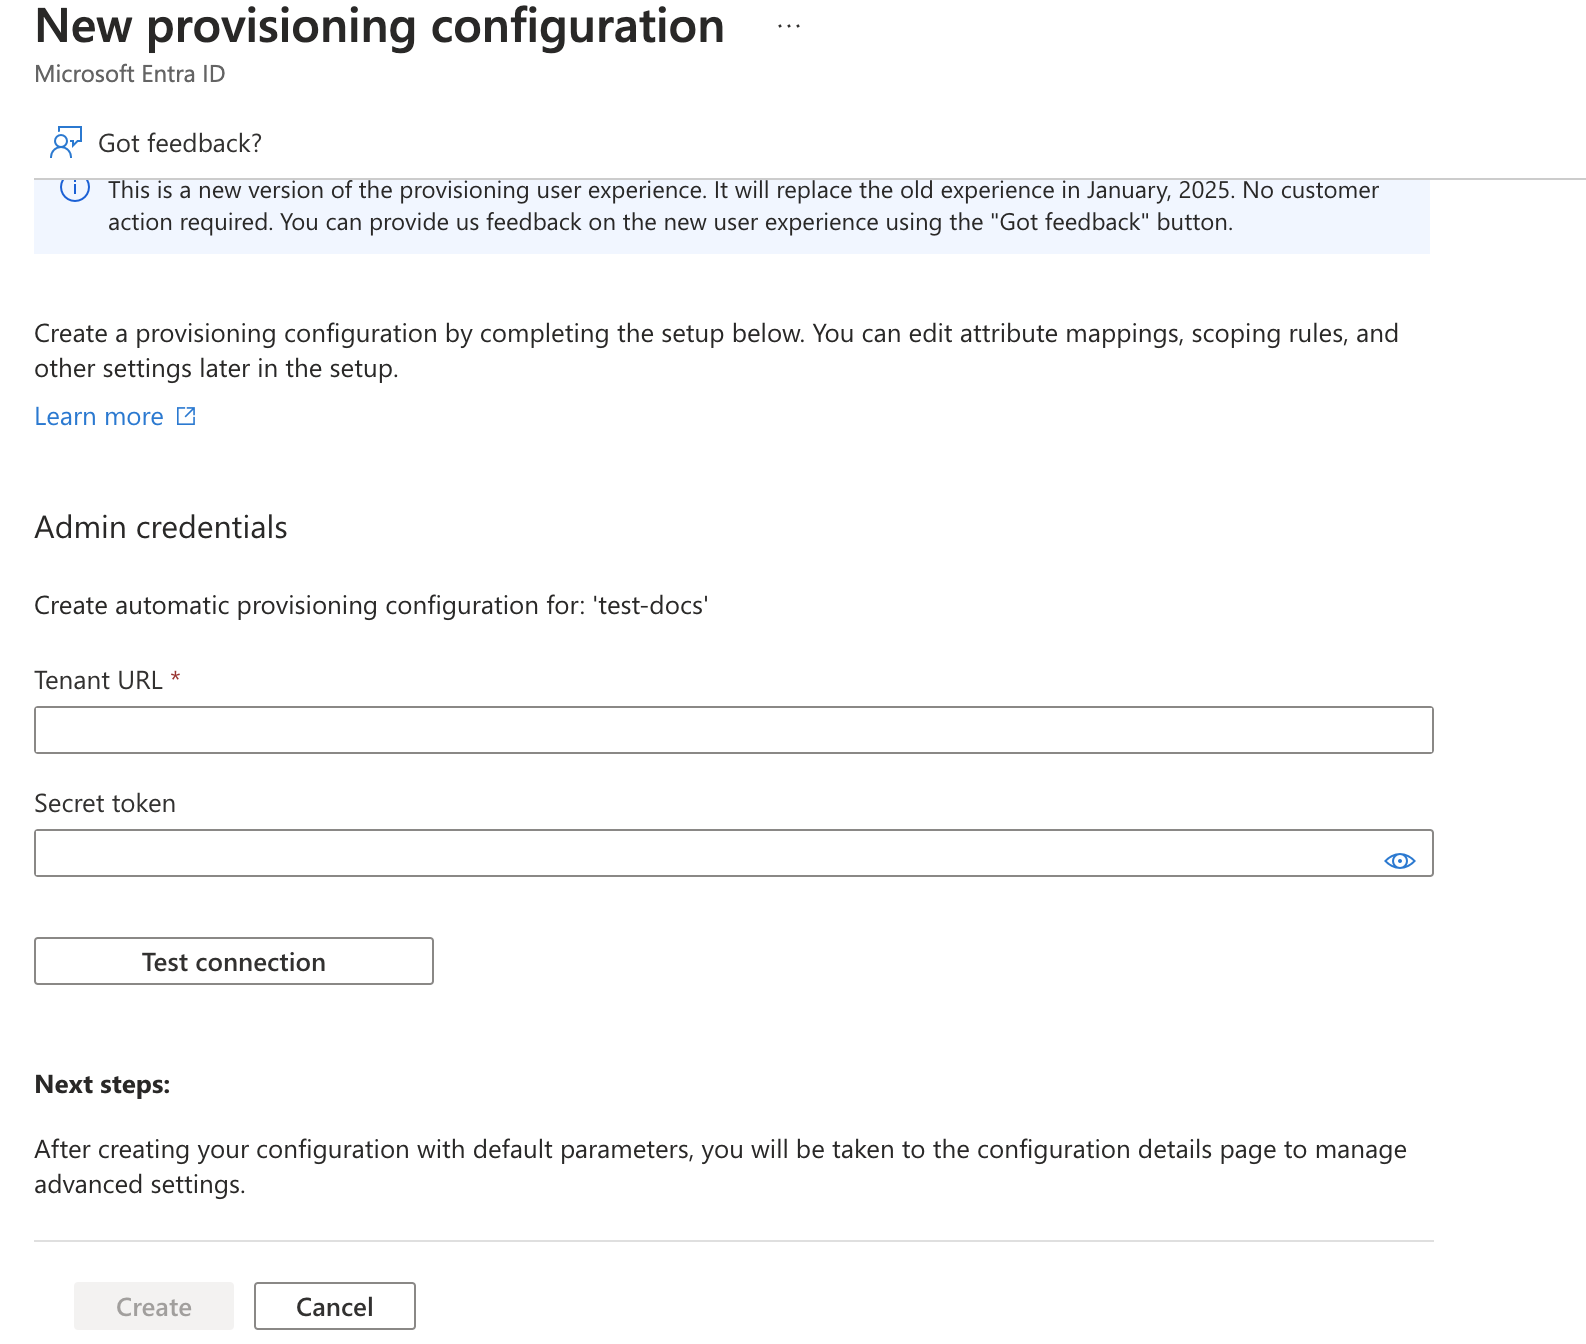 5. Obtain the **Tenant URL** and **Secret Token** from the Portkey Admin Settings page (if SCIM is enabled for your organization).
* [Portkey Settings Page](https://app.portkey.ai/settings/organisation/sso)
5. Obtain the **Tenant URL** and **Secret Token** from the Portkey Admin Settings page (if SCIM is enabled for your organization).
* [Portkey Settings Page](https://app.portkey.ai/settings/organisation/sso)
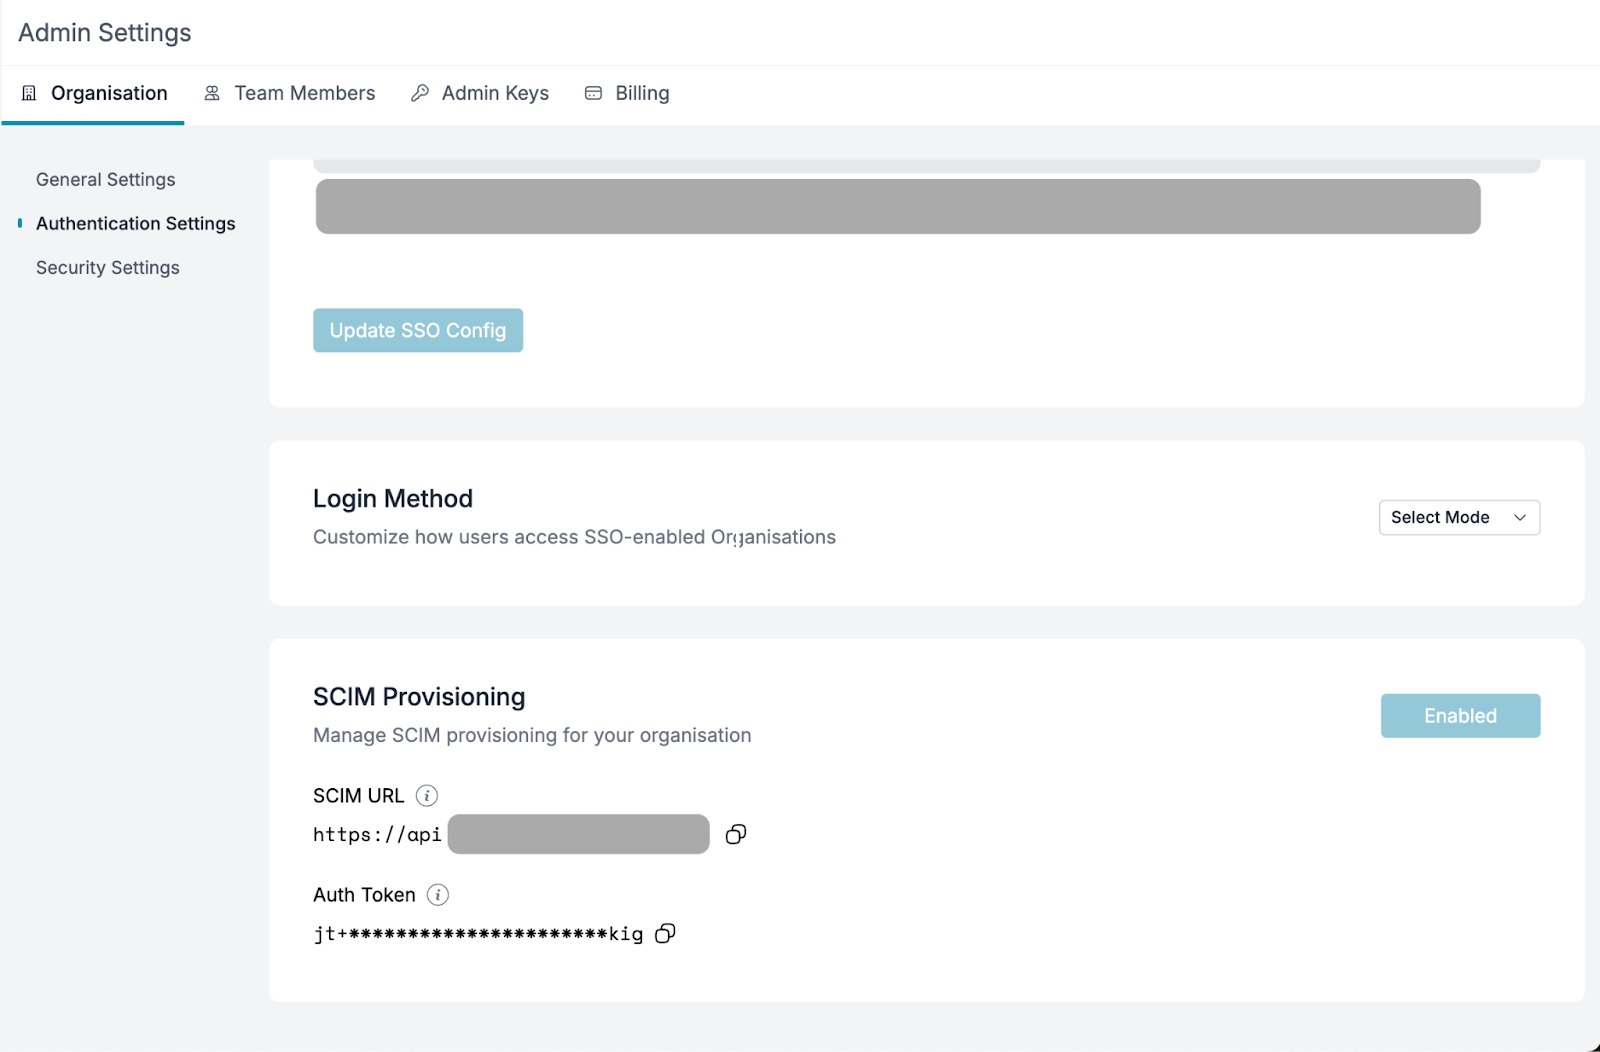 6. Fill in the values from the Portkey dashboard in Entra's provisioning settings and click **`Test Connection`**. If successful, click **`Create`**.
> If the test connection returns any errors, please contact us at [support@portkey.ai](mailto:support@portkey.ai).
***
##### Application Roles
Portkey supported roles should match Entra's application roles.
1. Navigate to **App Registrations** under **Enterprise Applications**, click **All Applications**, and select the application created earlier.
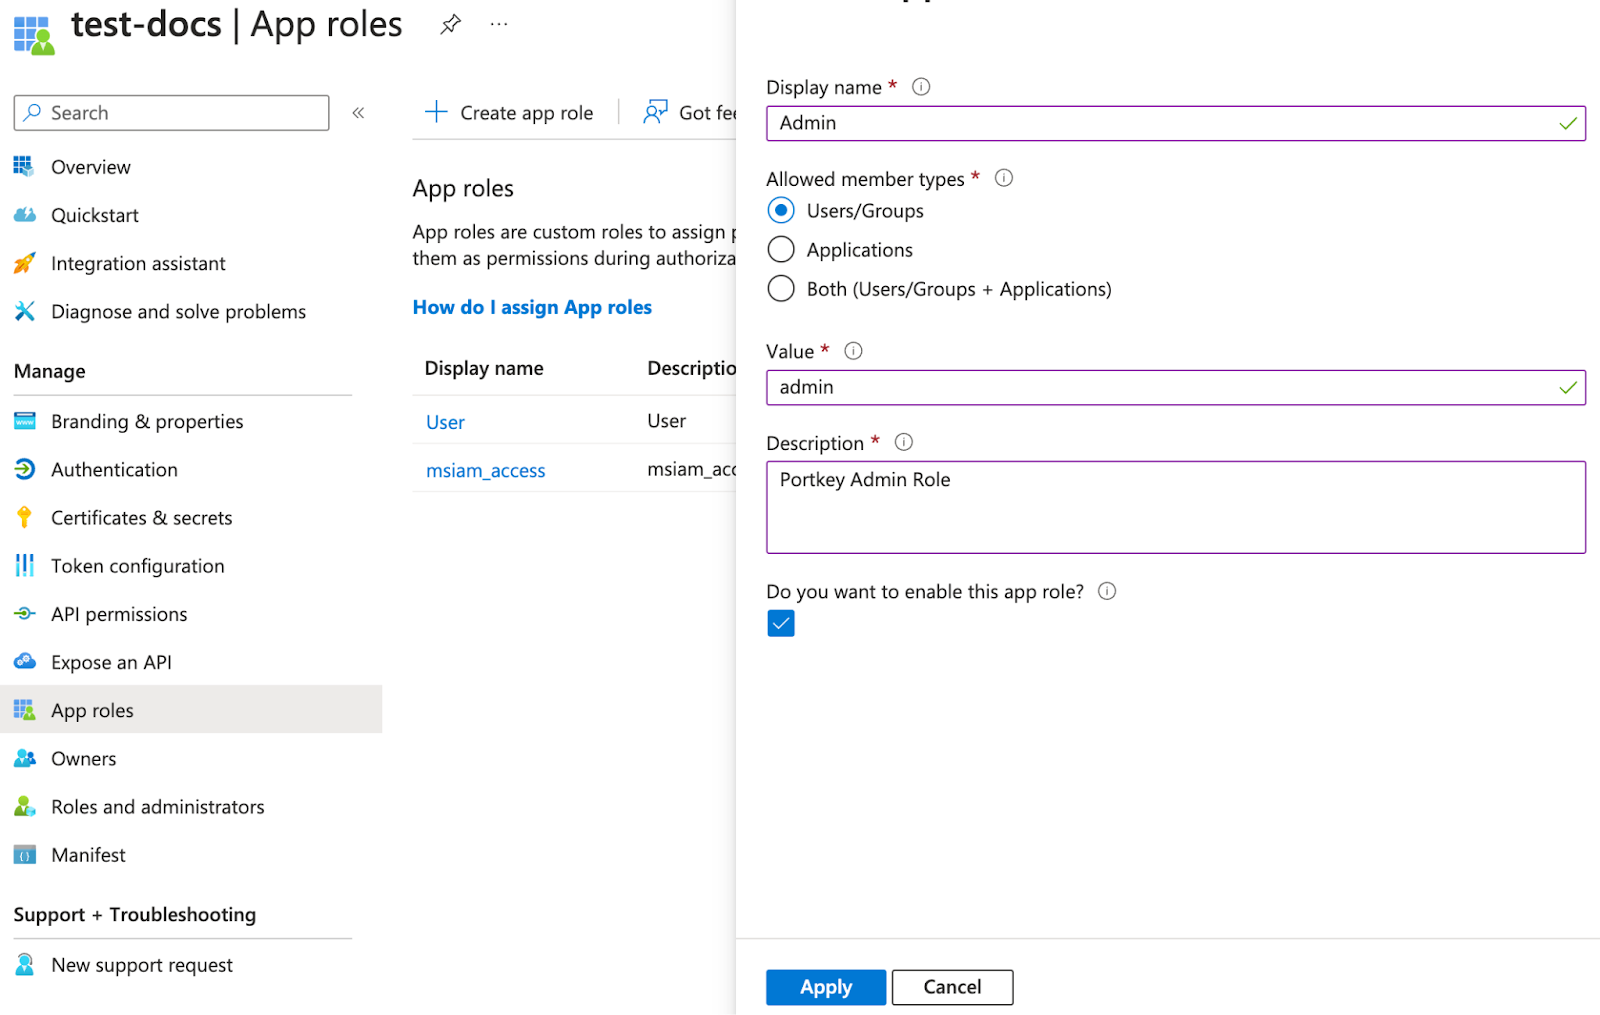
2. Go to the **App Roles** page and click **`Create app role`**.
> Portkey supports two application-level roles:
>
> * **`member`** (Organization Member)
> * **`admin`** (Organization Admin)
> * **`owner`** (Organization Owner)
6. Fill in the values from the Portkey dashboard in Entra's provisioning settings and click **`Test Connection`**. If successful, click **`Create`**.
> If the test connection returns any errors, please contact us at [support@portkey.ai](mailto:support@portkey.ai).
***
##### Application Roles
Portkey supported roles should match Entra's application roles.
1. Navigate to **App Registrations** under **Enterprise Applications**, click **All Applications**, and select the application created earlier.
2. Go to the **App Roles** page and click **`Create app role`**.
> Portkey supports two application-level roles:
>
> * **`member`** (Organization Member)
> * **`admin`** (Organization Admin)
> * **`owner`** (Organization Owner)
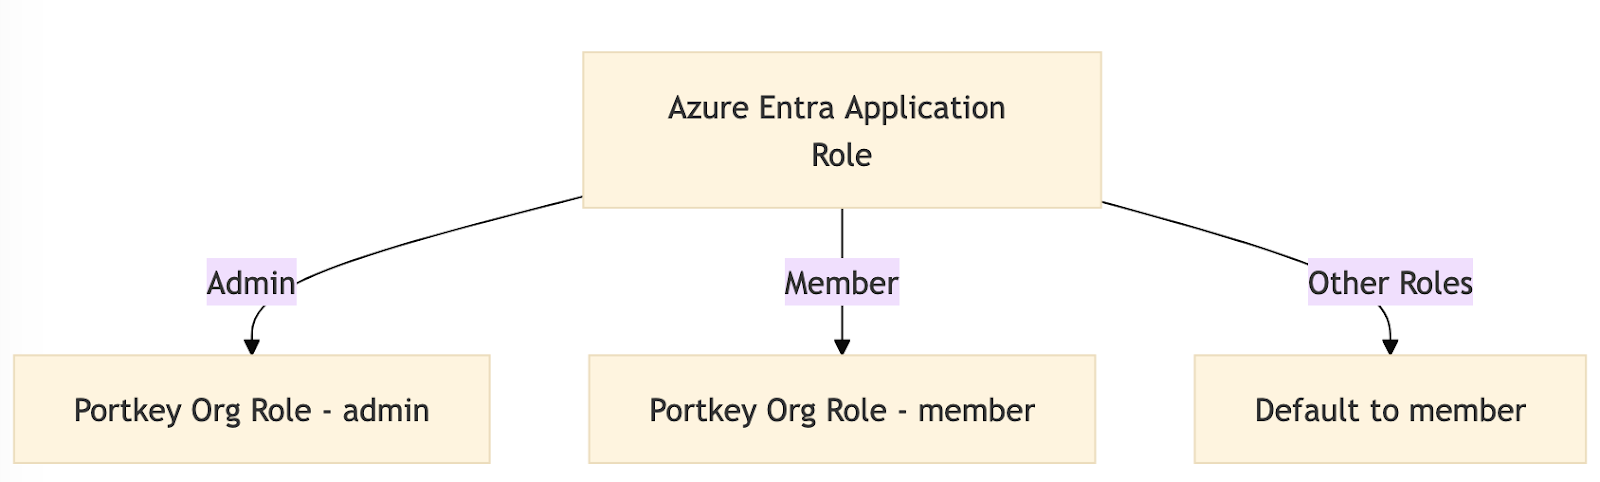 > Users assigned any other role will default to the **member** role.
3. To support group roles, create a role with the value **`group`** and a name in title-case (e.g., `Group` for the value `group`).
> Users assigned any other role will default to the **member** role.
3. To support group roles, create a role with the value **`group`** and a name in title-case (e.g., `Group` for the value `group`).
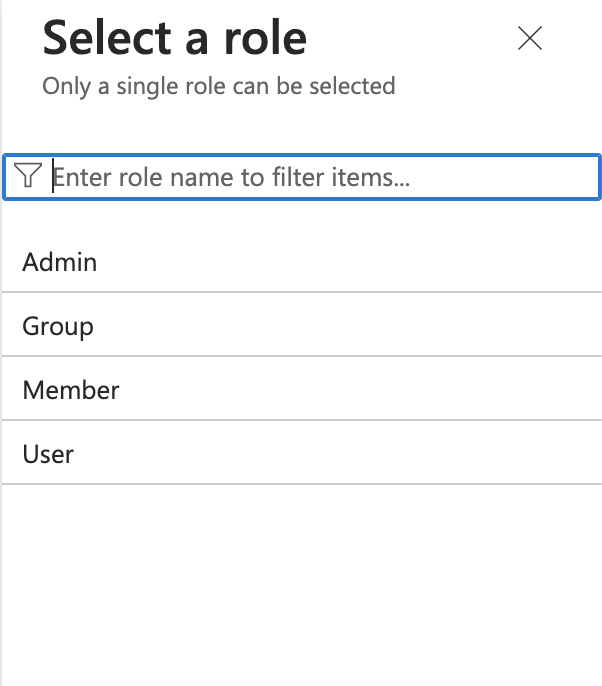
 4. Assign users to the application with the desired role (e.g., **`owner`**, **`member`**, or **`admin`**) for the organization.
 ***
#### Attribute Mapping
###### Adding a New Attribute
1. Go to the **Provisioning** page and click **Attribute Mapping (Preview)** to access the attributes page.
2. Enable advanced options and click **`Edit attribute list for customappsso`**.
***
#### Attribute Mapping
###### Adding a New Attribute
1. Go to the **Provisioning** page and click **Attribute Mapping (Preview)** to access the attributes page.
2. Enable advanced options and click **`Edit attribute list for customappsso`**.
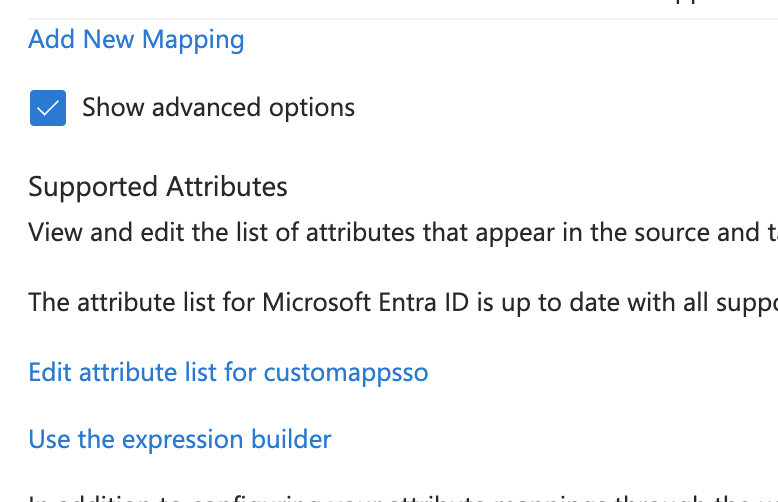 3. Add a new attribute called **`roles`** with the following properties:
* **Multi-valued:** Enabled
* **Type:** String
3. Add a new attribute called **`roles`** with the following properties:
* **Multi-valued:** Enabled
* **Type:** String
 ###### Adding a new mapping
1. Click on the **`Add new mapping`** link to add a new mapping. (refer to the above images).
2. Follow the values from the below image to add a new mapping.
###### Adding a new mapping
1. Click on the **`Add new mapping`** link to add a new mapping. (refer to the above images).
2. Follow the values from the below image to add a new mapping.
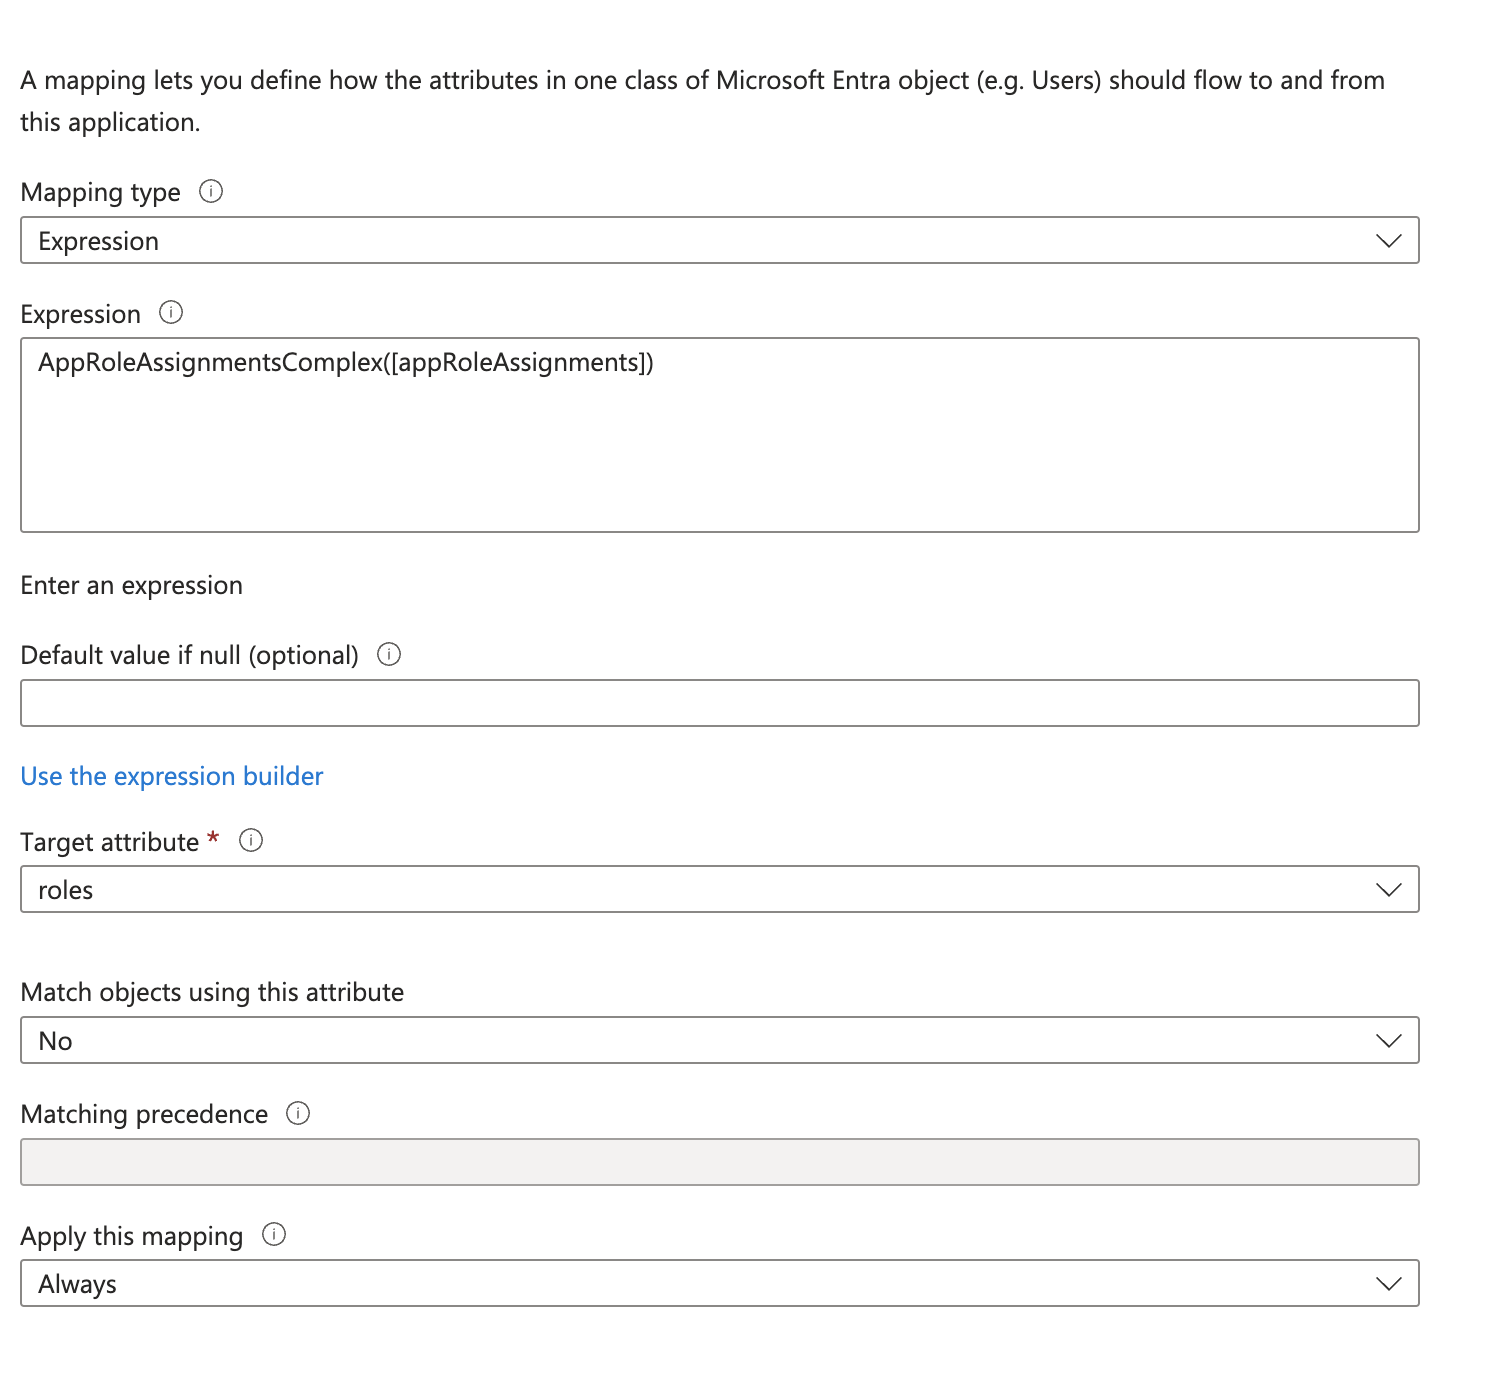 3. Once done, save the changes.
###### Removing Unnecessary Attributes
Delete the following unsupported attributes:
* **preferredLanguage**
* **addresses (all fields)**
* **phoneNumbers**
***
#### Updating Attributes
**Update `displayName`**
1. Edit the **`displayName`** field to concatenate `firstName + lastName` instead of using the default `displayName` value from Entra records.
3. Once done, save the changes.
###### Removing Unnecessary Attributes
Delete the following unsupported attributes:
* **preferredLanguage**
* **addresses (all fields)**
* **phoneNumbers**
***
#### Updating Attributes
**Update `displayName`**
1. Edit the **`displayName`** field to concatenate `firstName + lastName` instead of using the default `displayName` value from Entra records.
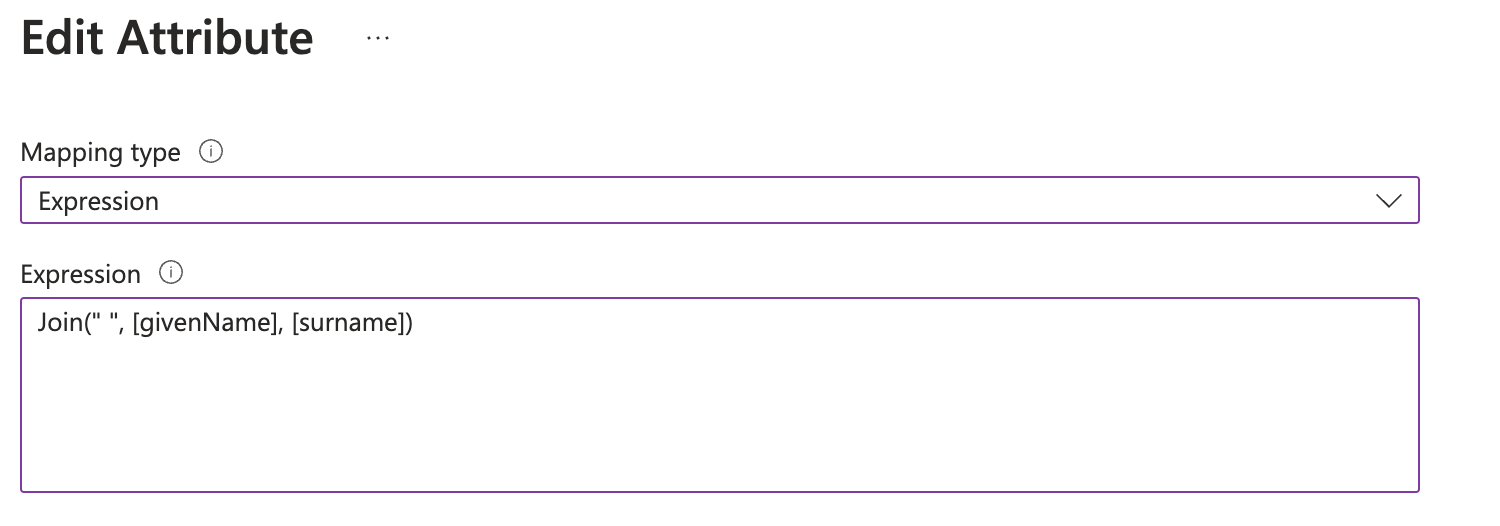 2. Save the changes and enable provisioning on the **Overview** page of the provisioning settings.
***
##### Group (Workspace) Provisioning
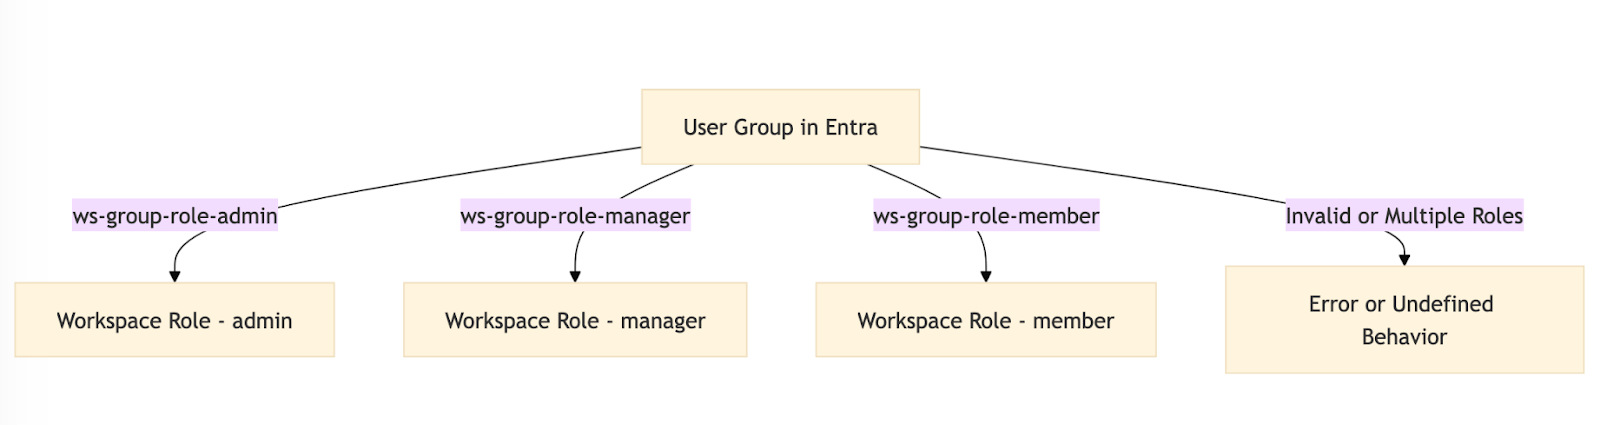
Portkey supports RBAC (Role-Based Access Control) for workspaces mapped to groups in Entra. Use the following naming convention for groups:
* **Format:** `ws-{group}-role-{role}`
* **Role:** One of `admin`, `member`, or `manager`
* A user should belong to only one group per `{group}`.
**Example:**
For a `Sales` workspace:
* `ws-Sales-role-admin`
* `ws-Sales-role-manager`
* `ws-Sales-role-member`
Users assigned to these groups will inherit the corresponding role in Portkey.
2. Save the changes and enable provisioning on the **Overview** page of the provisioning settings.
***
##### Group (Workspace) Provisioning
Portkey supports RBAC (Role-Based Access Control) for workspaces mapped to groups in Entra. Use the following naming convention for groups:
* **Format:** `ws-{group}-role-{role}`
* **Role:** One of `admin`, `member`, or `manager`
* A user should belong to only one group per `{group}`.
**Example:**
For a `Sales` workspace:
* `ws-Sales-role-admin`
* `ws-Sales-role-manager`
* `ws-Sales-role-member`
Users assigned to these groups will inherit the corresponding role in Portkey.
 ***
### Support
If you face any issues with the group provisioning, please reach out to us at [here](mailto:support@portkey.ai).
***
### Support
If you face any issues with the group provisioning, please reach out to us at [here](mailto:support@portkey.ai).